Cursus: Pre-check virtual training | mijnopleiding.esri.nl

    Introduction
    •••
    Table of Contents
    •••
    Pre-checks
    1
    2
    3
    4
    5
  • Introduction

    Welcome to the pre-check of Esri Nederland for (virtual) training courses, to be taken from your workplace at home or at the office.

    In this pre-check, you will go through a number of steps and tests to see if you can successfully follow the training course.

    Perform this pre-check well in advance, but no later than one working day before the start of the training course. If you have any problems, please contact opleidingen@esri.nl

    On the day itself the teacher cannot help you wilt your technical problems.


    • Table of Contents

      1. Introduction

      2. Table of Contents

      3. Pre-check checks:

      Step 1: Check the hardware and software requirements
      Step 2: Test Internet speed Internet Browser

      4. Frequently asked questions:
      Page 3: Which hardware setup can I use?
      Page 4: What is the lesson schedule / what are the contact hours?
      Page 5: What should I do on the lesson day itself?

      • Step 1: Check hardware and software requirements

        WHAT ARE THE MINIMAL REQUIREMENTS?
        What do you need to take a virtual training course?

          • A computer with an internet connection (preferably > 10mbps)
          • A current internet browser (for example Chrome or Firefox)
          • A microphone (a headset for a desktop computer or the built-in microphone in a laptop)
          • Optional: a camera 

        Since the training takes place from your own workplace, you are responsible for the hardware and also certain, non-Esri software.

        WE RECOMMEND IN PARTICULAR:
          • Windows 10 or 8.1 (Pro or Enterprise edition). If you are working with a Mac computer, the at least Mac OSX version 10.11 must be installed. See here for the exact specifications.
          • Linux is not supported for Webex. 
          • A wired, high-speed internet connection. WIFI is possible but test in the pre-check (step 3) if the speed is sufficient.
          • We do not recommend using Citrix or Terminal Server to connect. It is often more convenient and stable to use a local PC or private PC.
          • An HTML 5-enabled web browser met cookies, JavaScript ActiveX and plug-ins enabled.
          • The ability and privileges to connect to a virtual machine using Remote Desktop Protocol (RDP) or to install the Remote Desktop app if required. 
          • The ability and privileges to install a Webex client for communication.
          • A firewall configuration that provides access to ports 443 and 3389. Proxies must be disabled or configured to allow access. This is usually already the case at home.
          • The PC must be able to transmit sound through a headset or speakers. If you want to be able to communicate with the teacher via the PC, a separate or built-in microphone is required.
          • To carry out the exercises, it is useful to connect your PC or PCs to two screens. A tablet as an extra screen is also a possibility. 

        • Step 2: Test Internet speed Internet Browser

          A virtual training takes place from your own workplace. We provide a practice computer, equipped with all necessary software and licenses.


          In order to participate in the training, you must provide:

          • Two screens (a tablet can also be used as a second screen).
          • A microphone (for example: the built-in microphone in your laptop or a headset) and optionally a camera.
          • A stable internet connection, you can test your connection and network performance with the test below.


          Requirements:

          • Take this test from the location where you will be training.
          • We recommend a wired, high-speed internet connection. Wifi is possible but the test below of this is fast enough.
          • Run this test on a local machine (not on a Citrix or Terminal Server or with an active VPN connection).
          • Use an Internet browser that supports HTML5, such as Chrome, Edge, Firefox, or Safari.
          • Internet Explorer is not supported.
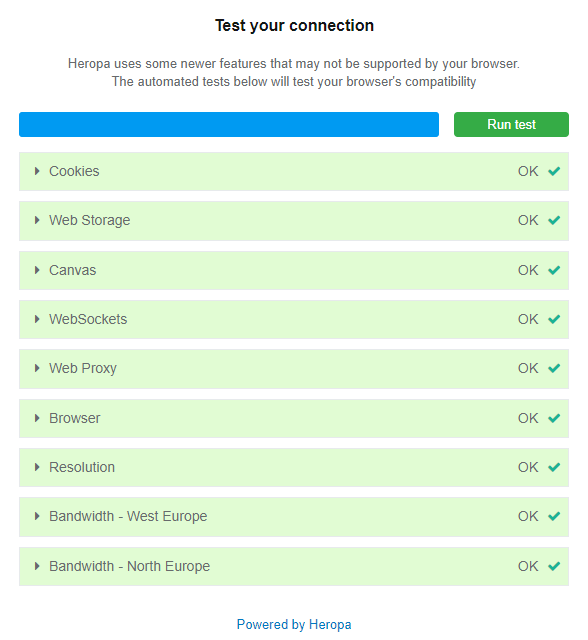

          Test
          • Click here for the test.
          • Click Start test 

          The test is successful when a screen similar to the one below appears:

          test Precheck

          In case of problems, please contact your own IT department. For technical information click here.

          Does the test show that your browser cannot access the camera or do you not have a webcam? Preferably you use a webcam, but if this is not possible you can still attend the training. However, for interactive training we recommend the use of cameras.

          • Which hardware setup can I use?

            During the training you use your own hardware. What exactly do you need?

            You will use the following applications during the training:

            • the Online Learning Environment (browser)
            • the Teams environment (Teams app)
            • the Virtual machine with Esri software (Remote desktop app or browser)

            Therefore, it is useful to have at least two screens.

            Figure 1 below shows an example configuration. In this configuration, two monitors are connected to a PC. The left screen displays the Online learning environment (https://mijnopleiding.esri.nl/) and the Teams environment. The right screen displays the virtual machine.


            This is especially useful when doing the exercises. On the left you have the exercise document (PDF) in which the exercises are written out and on the right you have the ESRI software at your disposal. In any case, listening to the videos (via the online learning environment or listening to the teacher (during the virtual classroom courses with Webex) takes place on the local computer (NOT in the virtual environment).
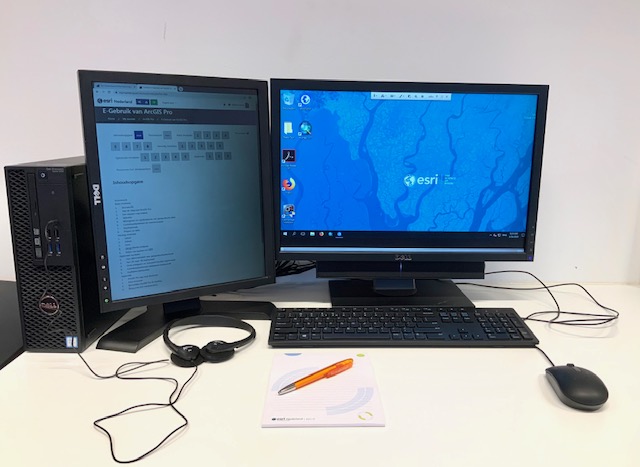
            Ideale opstelling voor Virtuele Training

            Figure 1

            Another possible setup is shown in figure 2 below. This configuration consists of a tablet and a laptop. Both are connected to the Internet but not to each other. 

            The table (in this example an Ipad) displays the Online Learning environment (https://mijnopleiding.esri.nl/) and the Webex environment. The laptop displays the virtual machine. The disadvantage of this setup is that demos of a teacher are difficult to see and that you cannot cut and paste text from the exercise to the virtual machine. In general, that is not a problem. You sometimes have to type a little more text. In this setip the Webex environment could also be displayed on the laptop.
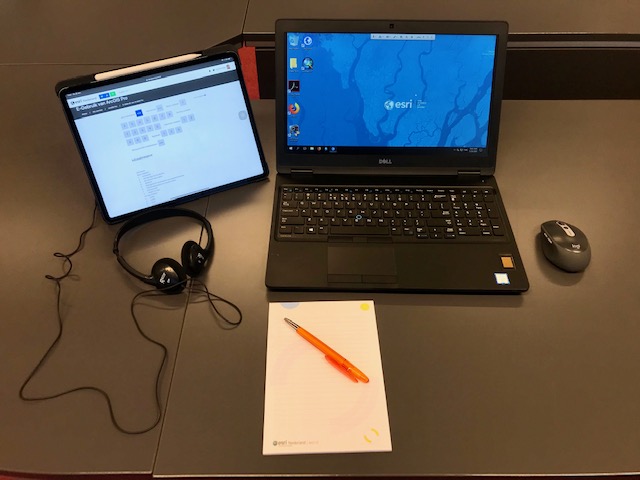
            Laptop & Ipad

            Figure 2

            Below a general checklist:

            • Find a quiet place
            • Use two screens (e.g. laptop and tablet)
            • Use headphones
            • Use a microphone (e.g. a headset for a desktop/laptop or of the built-in microphone on a laptop)
            • Keep your cell phone handy with the number of the teacher in case of any problems
            • What is the lesson schedule / What are the contact hours

              The schedule for training courses is:

              09:30 - 12:30

              12:30 - 13:30 Lunch break

              13:30 - 16:30

              For virtual classroom training: the teacher may deviate from this schedule.
              For virtual e-learning the above times are the times you can contact the teacher.

              • What should I do on the lesson day itself?

                Before the training you will receive a number of emails from which you can start the applications you need:

                • An email with an invitation for the Webex training session (sender: messenger@webex.com).
                • An email with credentials for the virtual machine (sender: trainer)

                What should I do on the training day itself?


                Half an hour before the start of the training (9.00 am), you must do the following:

                • Step 1: Start the Webex-sessie (Webex app or Browser), from the mail
                • Step 2: Start the virtuele machine (Remote Desktop app or Browser), from the mail (button Go to event at the bottom of this mail).
                • Step 3: Start the online leeromgeving (https://mijnopleiding.esri.nl)

                If necessary, see the steps below for a futher explanation.

                Step 1. Start Webex-session

                Connect to the Webex-session:

                • In the mail from Webex, click the link in this mail to attend the session.


                • Enter your name (the email address and password have already been entered) and click Join Now (for use of the app) or Join by browser (for use of the browser), depending on the option you used during the Pre-check.


                You cannot participate until the teacher has started the meeting.

                Step 2a. Method 1: Start virtual machine via the app

                Apps function differently in Windows 10 Enterprise and Windows 10 Pro. Choose your operating system and follow the steps below.

                Windows 10 Enterprise: Remote Desktop Connection app

                This section describes how to make a connection on a Windows 10 Enterprise computer. Starting the virtual machine from the Remote Desktop app is preferred, because it works the fastest and is the most stable. If this does not work on your machine, go to the "2b. Method 2: Start Virtual computer (Browser)"step below.

                • In your email invitation, click the Go to event button at the bottom of this mail or use the link at the bottom of the mail. These options already contain your own access code.


                • Check the other fields.
                • Click the Log in button.
                  If your session is not yet active, a message appears:


                  The session is active 30 minutes before the start of the training.

                • Click the link Connect with desktop client to find the IP-address you will use.


                • In the expanded screen that appears, you can find the IP address of the virtual machine on the right:


                • Copy this address (CTRL+C).

                • Open the Remote Desktop app and paste this IP-adres in the field Computer (CTRL+V).

                • Click the Connect button.

                • You will now be asked for a name and password. 

                  Click the More choices button.

                • Select Use a different account.

                • Enter the following information:
                  User name: student
                  Password: Training12345

                  Note: the password is case sensitive.

                • Click OK.
                  In the Certificate screen, select
                  Yes

                  You are now in the remote computer.

                • If your computer is locked, click the Ctrl+Alt+Del button at the top of the screen and fill in the password Training12345 to unlock the computer.

                When you have connected to the virtual machine, you are ready to start using the applications you want. It sometimes takes some time for the ArcMap license to be activated in the session. Start ArcGIS Pro can also take some time the first time.

                At the end of the day, click the X Disconnect button to exit the session.

                Windows 10 Pro: Remote Desktop app

                This section describes how to make a connection on a Windows 10 Pro computer. Starting the virtual machine from the Remote Desktop app is preferred, because it works the fastest and is the most stable. If this does not work on your machine, go the"2b. Method 2: Start Virtual computer (Browser)"step below.

                • In your email invitation, click the Go to event button at the bottom of this mail or use the link at the bottom of the mail. These options already contain your own access code.


                • Check the other fields.

                • Click the Log in button.
                  If your session is not yet active, a message appears:


                  The session is active 30 minutes before the start of the training.

                • Click the link Connect with desktop client to find the IP-address you will use.


                • In the expanded screen that appears, you can find the IP address of the virtual machine on the right:


                • Copy this address (CTRL+C).

                • Open the Remote Desktop app.

                • Click the Add button.

                • Select Desktop.

                • Paste the IP-address (CTRL+V) in the field PC Name.

                • Click Save.

                • Double click the saved desktop.

                • Enter the following information:
                  User name: student
                  Password: Training12345

                  Note: the password is case sensitive.

                • Accept the certificate and click Connect.
                  You are now in the remote computer.

                • If your computer is locked, click the Ctrl+Alt+Del button at the top of the screen and fill in the password Training12345 to unlock the computer.

                When you have connected to the virtual machine, you are ready to start using the applications you want. It sometimes takes some time for the ArcMap license to be activated in the session. Start ArcGIS Pro can also take some time the first time.  

                At the end of the day, click the X Disconnect button to exit the session.

                2b. Method 2: Start virtual machine (Browser)

                This section how you can connect to the virtual machine using the browser, when you were unabel to install an app.

                • In your email invitation, click the Go to event button at the bottom of this mail or use the link at the bottom of the mail. These options already contain your own access code.


                • Check the other fields.
                • Click the Log in button.
                  If your session is not yet active, a message appears:


                  The session is active 30 minutes before the start of the training.

                • Click the Connect button.

                   
                • A separate tab appears, with the URL: https://matchmaker.readytech.com/server/<<your access code>>/<<unique number>>/view

                • The remote machine is visible within this browser tab. At first the compyter may be locked.

                • The toolbar at the top allows you to communicate with the remote machine.


                • If necessary, click the dropdown arrow next to the Keys button and select Send Ctrl + Alt + Del to unlock the computer.


                • Enter the password Training12345
                  You are ready to start your application(s).

                When you have connected to the virtual machine, you are ready to start using the applications you want. It sometimes takes some time for the ArcMap license to be activated in the session. Start ArcGIS Pro can also take some time the first time. 

                • At the end of the day, click the X Disconnect button to exit this session.

                NOTE
                When you unexpectedly get the following screen:

                • Close this browser tab and start the session agian via the button Go to event or the link, both in the invitation mail.


                3. Log into the learning enviroment

                For login details for the Online Learning Environment (containig de data, theory powerpoints en exercises), the following:

                • Select English at the top left of the page.


                • If this is your first time logging into this environment, please use: 
                    • Username <your company email address> 
                    • Password = Student01 
                      Note: Thit is a capital letter “S” and at the end te numbers zero and one. 
                    • Change your password when asked. Your password must be at least 8 characters long, contain at least 1 number, at least 1 lower case letter and at least 1 upper case letter.

                • For students who already have a login, log in with the credentials that you checked in thePre-check.